Moving content between environments
Did you build a masterpiece in your test environment that you'd like to show your users? You don't have to rebuild it – you can export and import any content between any environments on the platform.
Export
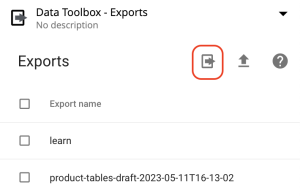
1. Open the Export widget
In the right-hand side context panel within Content Studio, you will find a list of widgets. Normally, it is set to "Details" in the Content Studio overview. Use the dropdown and select "Data Toolbox – Exports".

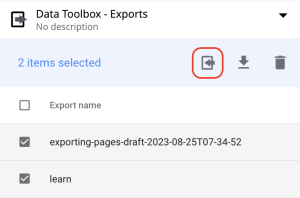
2. Find and select content
Use the checkboxes to select one or more content that you'd like to move. Selecting a page or content that has sub-content will export them all together.
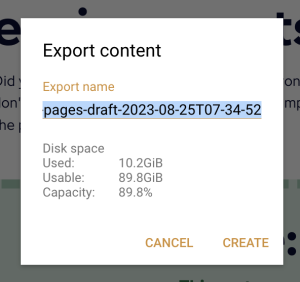
3. Export content
When all contents that should be moved have been selected, click the arrow pointing to the right, as if physically pushing them to the list of exports.
This will open a dialogue box, in which you can rename your export. This isn't crucial, as long as you're able to recognise the export later. Click "create" to export the content.
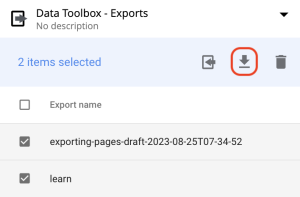
4. Download the export to your computer
In order to do the actual shift, your computer must serve as a sort of moving van. To download the content, click the arrow pointing downwards. This will create a ZIP-file containing all exported contents.
Import
1. Change environment
Now that you have exported the content you wish to move, go to the environment that should receive this content. If you built and exported it in your test environment, you are probably going to import it to your production environment.
You can also move content between different sites on the same platform, for instance from gjensidige.no to gjensidige.com, which would mean you should open Content Studio for gjensidige.com next.
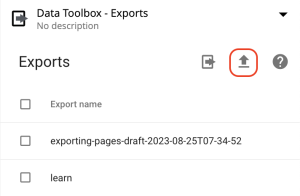
2. Upload the export
In the receiving environment, select the "Data Toolbox – Exports" widget in the context panel again. Click the arrow pointing upwards to upload the ZIP-file from your export.
Moving later
You can always move the content after the import. If you're importing several contents with several paths, you can just select the root/front page.
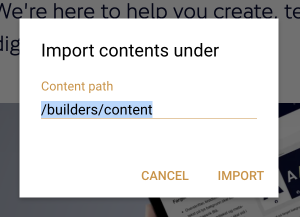
3. Select the correct path
When importing new content, it has to be added somewhere within the existing tree structure – exported pages won't bring their path with them. Doing as you normally do when creating new content, select the page or folder it should be placed beneath, so that it's highlighted.
An imported page that should have the URL "gjensidige.no/bedrift/forsikring/exported-page" must be placed beneath "Bedrift" and then "Forsikring", meaning the "Forsikring" page should be selected before you make the import.
4. Import the content
Select one or more exports that you'd like to add to the selected path. New exports are added to the top of the list, and the name should give you an idea of which is which content.
To import the content, click the arrow pointing to the left as if physically pushing it into the tree structure. This will open a dialogue box that asks you to confirm the path you have selected for the new content. Double-check it and click the "Import" button when you're ready.
5. Publish the imported content
Imported content will be added as "Unpublished", so you will need to publish it. If you have imported content with sub-content, remember to publish the entire tree.
If it ended up in the wrong place, remember to move it before publishing, so you don't have to do it twice.