Building team pages in Content Studio
Would you like to create or maintain a page for your team? We'll show you how!
There are plenty of good reasons to have team pages on gjensidige.builders. Everyone across the organisation get to know who works where, and what the different teams are working on. Some teams even use these pages to share their own OKRs.
However, these pages are only valuable if they're up to date. Team members come and go, structures and responsibilities change, and we're dependent on you people to keep them usable and trustworthy.
Get access to Content Studio
The team pages on gjensidige.builders are built in Enonic's XP Content Studio. To create or edit your teams page, you must ask for access to Content Studio.
- Try to enter Content Studio and get an error message (so that your name pops up in the system)
- Message us and request access. Include the name of everyone who should have access and what team page you'll be editing.
- Still unable to enter? Delete your cookies – your browser still remembers that you couldn't access it the last time.
Need help? We'd be happy to help you! Give us a shout at #builders-designsystem on Slack.
Find your page and edit it
- From the XP start page, select Content Studio
- Use the small arrows on the left of the content to dive deeper into the URL structure. All team pages are located under Builders > Community
- Locate your team page from the list and double click it to edit

Building pages with parts
Want to learn more about using parts?
- See Creating and editing webpages
- Get an overview of all parts.
You can build the pages pretty much as you please. We do,however, have a few guidelines as to what all team pages should contain:
- A header. The title should be the name of the team. (Use the Header CTA part)
- Introduce the team members! (Here you use the Contact part)
- The team responsibilities. Say something short and sweet about your purpose - what you're working on. If you want to, feel free to include things like screenshots of your products, your OKRs etc. Some teams also share links to their Figma files, Miros, and GitHubs here. (Use the Article: Text Section and/or Article: Images part for this one.)
- Include contact info - for instance a link to your Slack channel, team email etc. (Maybe include some Side content like a Tip or Info box to one of your article parts? Or something else? Test and try!)
As long as you have these four types of content, feel free to go wild with the rest - or don't.
Editing, adding and removing team members
This is the most frequent updates. These are displayed with the Contact part and the Person content type.
Adding a team member
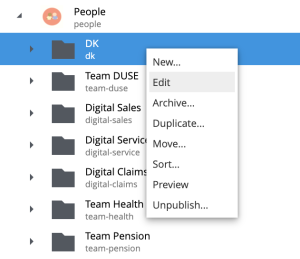
- From Content Studio, find and expand the "People" folder.
- Locate and select your team's folder, so that it is highlighted, right-click it and select "New..."
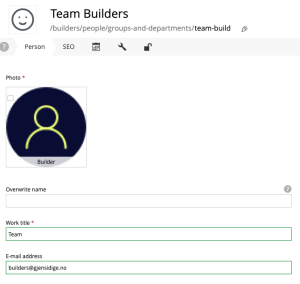
- From the dialog box, select the content type "Person"
- In the first, top left input, write the team member's full name. This will be displayed in the part.
- Upload an image. If you don't have an image of the team member, you can leave it blank, and a placeholder image will be displayed on the website.
- Fill in the team member's role and email address.
- Save, mark as ready and publish.
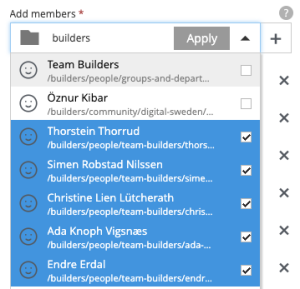
- Edit the Contact part on your team page. Open the dropdown or search for the new team member, tick the checkbox and click "Apply". You may also select multiple team members by ticking several checkboxes.
- New team members are added to the bottom of the list. You may drag and drop them to where you'd like them.
- Save, mark as ready and publish the page.
Editing a team member
- Either find the team member from the People folder or the Contact part on the page
- Click the pencil icon to the right of the name to edit the team member from the list
- Make your changes. To add a new image, click the existing image, select "Remove" and upload the new image
- Save, mark as ready and publish. You don't have to publish the team page unless you've made changes to it
Removing a team member
- Click and edit the Contact part on the page
- Find the team member in the list
- Click the cross icon to the right of the name to remove the team member from the list
- Click apply to update the page
Leaving for good?
If the team member is leaving Gjensidige, you should delete the Person content type, so that we don't store their data.
- From Content Studio, find and expand the folder "People"
- Locate and select the Person you'd like to delete
- Right click it, select "Archive" from the menu and confirm the archiving.
Made a mistake?
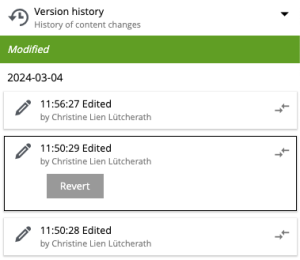
If you're missing the CTRL+Z function, fear not! You can always retrieve a previous version of your page.
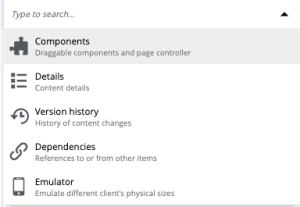
- On the top of the right-side menu, there's a dropdown that says Components while you edit your page. Open the dropdown and select Version history.
- Find the version you'd like to retrieve. Each time your page is saved, a version is created. You can find the correct version based on date and time.
- Click the version to display and click the Revert button. This version will be created on top of your current work, so it won't be lost.
- Open the dropdown again and select Components to go back to editing the content on your page.