Get started editing web pages
We build our websites in Enonic Content Studio. To create pages and edit content, you start by getting access there.
1. Get access
New to Gjensidige?
If you want a thorough onboarding we're happy to help - just send us a message on Slack!
- Get access
- Hot tip: Install the edit bookmark to jump straight to editing from any page
- Make sure you're invited to all collab sessions and/or guilds relevant to you. Let us know if you need an invite!
2: Understand the content model
We have only two diferent page types, so that one's easy. Each page type can be filled up with different content types, like photos, videos, links, charts, events etc.
3: Get familiar with the design
Now we're down to what makes it all look and feel like Gjensidige. In Content Studio you build pages using parts and fragments - the building blocks we all use to compose a page.
To make sure all Gjensidige web pages are equally usable, on brand and just generally good looking, we align design, parts and building blocks across all business areas and countries.
4: Get cracking!
There are few rules, but with great freedom comes great responsibility:
Follow the guidelines, collaborate with your colleagues, and go make great things!
Ask for access to Content Studio
To get access to the CMS for one or more domains, reach out to the responsible editors:

Helene Evensen Bakke
Digital editor

Marie Brudevold
Communications manager | Web editor

Victoria Junge
Digital Business Developer
Anna Stark
Web editor | copywriter
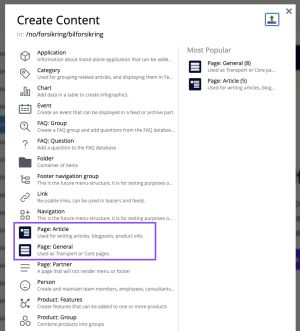
1. Create your page and choose a page type
When you add a new page to your site, you'll see two page types in the list of available content types. Choose Article for long-form text content and General for everything else

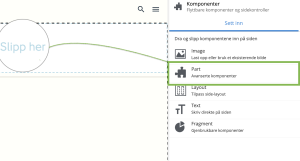
3. Add parts to your page
To add parts to your new page, click on the page and select "Customize".
Now you can select the "Insert" tab on the right section of inside the "Components" widget in the Context Panel. Then drag a part selector to the middle section page builder.
Are there already parts on your page?
You may find that your new page is already populated with parts. This is because a template is in use, which you may or may not use as a starting point.
3. Prioritise your content with drag-and-drop
Other than placing Header-parts at the top of the page, there are no strict rules on how to combine and prioritize parts:
- Plan your content
- Place the parts in the order that best suits your needs
- Use the drag-and-drop functionality to rearrange the parts as needed
- Think "mobile first": Although you may place tasks and cards next to each other on desktop, they will stack beneath each other on mobile, causing lots of scrolling